Well after some thought, I figured it was time to roll up my sleeves and install some tools and frameworks to start with my minimilist IoT playground. I use macOS and will focus just on that.
Environment under macOS
I first started to go down the path provided at mean.io and felt there was too much of a heavy lift for a newbie trying to ramp up on four technologies at the same time. I opted for installing each of them by hand so I can see the type of problems can occur.
$ curl -o- https://raw.githubusercontent.com/creationix/nvm/v0.33.2/install.sh | bash
$ nvm install node
$ nvm ls # list of node versions installed
$ nvm
$ nvm alias default 7.8.0 # I want to keep version 7.8.0 as default
If the NVM is too much of a hassle, get node directory from node.js via download Node.js – It is already newer than the version I have (7.8.0). This is an easy install and should not pose any problems
Express Generator – another straight forward install for light weight web framework
$ npm install -g express-generator
# change to a directory where you want to install the express templates. e.g. min is chrapchp/Dev/nodes
$ express HomeSensors # what I called my app
$ cd HomeSensors
$ npm install
I installed the following as well based on what I thought I needed for this learning exercise.
A few years ago I had boat loads of temperature envelop data of my house and outside temperature. When I was looking for quotes to re-insulate my old house, an insulation vendor expressed interest in purchasing my before and after analysis and results. I did not proceed with a full re-insulation of my house but did end up loosing my data which was 100% my fault. I did not back up to a NAS and experiences a hard drive failure.
Fast forward today. There is lots of talk of IoT, Analytics, and cloud services. Many, I feel are putting lipstick on their outdated products so buyer beware. That said, the various IoT ecosystems provided through services such as Microsoft Azure, etc. are making it easier to mashup, collect, aggregate, and analyze data. Alarm Management, historians may become moot at some point unless vendors provide added value services such as predictive analytics and performance management solutions.
My interests these days revolve around machine learning and visual analytics but I do like to keep on top of some technology that can be used to marry IoT with the enterprise. With the handful of XBee devices lying around, I’ve set my eyes to ramp up on the MEAN (MongoDB, ExpressJS, Node.js, AngularJS stack and see what I can come up with for my own use at home. I chose a Typescript/Javascript environment as I can get by with basic open source tools and decent editors without having to get something like visual studio.
Key System Architecture Components
1-configure XBee end devices to sleep and send to coordinator AI/DI data. (I’ve tested this a few years ago so I know it works) (Temperature, ambient light, etc) Mesh network using API mode.
2. 0 or more routers to relay the messages from the end devices to the coordinator
3. 1 coordinator that feeds into the system via serial port
4. Node.JS+ Express to handle the configuration of the I/O wired to the XBees. e.g. scaling, tag name, etc. MongoDB to persist the data, and angularJS to render the UI.
5. There are three IoT platforms ( GE Predix , Xively, ThingSpeak, and Azure IoT ) that I have accounts with that I would like to push data to to test it out. I have two SCADA and one HMI system that I am also going to test out the IIoT readiness.
6. My home power monitoring has been running for 8 years on arduino and XBee. The next step is to push data rather than poll from the host to see what that SCADA system can do.
Further down the horizon the inclusion of some MQTT flavour and and node.js integration.
With Swift 3, watchOS3, and iOS 10 released, it was time to migrate the code from Swift 2.1 to Swift 3.0 using Xcode 8.0. I still have use for my Myo armband but wanted to explore using Apple’s CoreMotion and HealthKit SDKs. The conversion tool in Xcode did a great job and most of it was dealing with optional chaining that required my attention. Once completed, the existing application worked as before. Although the bluetooth code migrated ok, I was left with a handful of deprecations warnings in iOS 10.0 that will need clean up so I can keep current on iOS releases. For now, I wanted to explore how to use the iWatch Series 1 to achieve the following goals:
Capture Heart Rate and include with geolocation data in the iPhone app
Detect and send turn signals to LED Vest
Display Temperature and Battery Voltage with alarm set points
Learn more about the Swift language, the various SDKs
Watch interface
Hats off to UIX designers. This does not come easy to me. I ended up purchasing Graphics (was iDraw) from Autodesk as it was affordable and comes with a rich feature set. A nice bonus is that this tool can generate can generate Core Graphics “copy as” code. Alas, my first pass works and leveraged the context menus to save on screen real estate.
Context Menu
The context menu used canned icons. The start/stop implement the obvious functionality. The Speak functionality allows me to either send one of three messages or speak into the watch and send the resulting text to display on my LED Vest. The user interaction side was rather easy to implement using the presentTextInputController method of the WKInterfaceController class.
func sendLEDMessage() {
    let phrases = ["Smile. Be Happy.", "One day at a time", "Technology Rocks!"]

    presentTextInputController(withSuggestions: phrases,
        allowedInputMode: .plain,
        completion: { (result) -> Void in

                                    if let choice = result {
        if self.isHostCommunicating() {
            if let statement = choice[0] as ?String {
                let requestValues = ["command" : statement]
                let session = WCSession.default()
                //print("Message=\(requestValues)")
                session.sendMessage(requestValues, replyHandler: {
                    reply in
                                                    self.cmdStatus = reply["status"] as ?String
                }, errorHandler: {
                    error in
                                                    print("error: \(error)")
                })
            }
        }

    }
})

}
Observations
Extensions
Swift extensions are your friend. One can extend classes without access to source and add additional behaviour. For example, to quickly implement alarm functionality, WKIntefaceLabel was extended to allow a refresh a label.
Healthkit is a pain to get going using just Apple’s docs. Fortunately, there are lots of tutorials out there to help get things going. I would have liked to have more detailed information so one can track heart rate variability (HRV). These folks are working on some cool stuff mashing technologies using HRV. It seems we are left with BPM samples at around 5 second intervals. I get why, given that there could be other apps wanting access to this information and sub second resolution in a device that was meant to tell time at first would overwhelm watchOS. I suspect one day this should be available.
Core Motion vs. Myo
I found Myo integration to detect hand signals easier to implement. It was more intuitive. On the Myo, the “home” position would be cached so relative changes in movement could be computed. e.g. right hand turn gesture using pitch and left hand turns using yaw and roll. It works quite well.
I could not get this to function using that same approach with consistent results on the iWatch. I ended up working with just gravity component for hand signals position. e.g. right turn detection is using the X component of the accelerometer and the Y component for the left hand turn. Initially, I used CMDeviceMotion‘s CMAttitude component and used multiply(byInverseOf: x) method of CMAttitude to get relative changes in motion. It worked for the right hand turn but was inconsistent for the left hand turn.
The gravity only component with a range threshold range works ok for now. I will investigate the CMAttitude further and will look at integrating (summing changes along X,Y, Z over small sample windows to detect hand signals.
I’ve been tossing this project in my head for a few years. I signed up when the Myo Armband came out on kickstarter and figured I could make use of it one day. When I purchased the the Apple Watch, then that got the wheels in motion to build an LEDVest.
Some of the goals I wanted to achieve included the following:
Persist information on iCloud and retrieve from different devices
Create something useful and provides context based information to others while riding my bicycle at night
Explore iOS HealthKit and MapKit
Prototype
My wife did all the sewing. The LED’s are so bright that the iPhone camera does not do it justice inside. Many people commented from motorists, pedestrians, and cycles on how cool this vest was.
It took a lot of effort but it was a nice diversion from the day job. Learning a new programming language, organizing the code so that the appropriate level of abstractions exist to easily add new features, creating an application level protocol to control the LEDVest, and designing and building simple hardware bumped up the fun factor.
Using my Apple Watch, I can speak text to display and I send it to the LEDVest to display. If I am annoyed at a stop light, I tend to keep it safe. e.g. “Smog sucks”. So far the software periodically displays the temperature from the hardware, along with the WTI price and Canadian currency via the yahoo finance API. If I loose connectivity to the iPhone, the arduino portion fails-safe and displays the stop symbol and posts the temperature every 30 seconds.
For some of you who live in older homes, the feeling of too cold in the winter and too hot during the summer comes with the package. Last year, I thought of getting spray foam installed and figured now is the time to start analyzing the some of the data I’ve been collecting over the past three years. I told the installer that I had three years of data and would do a before and after test to see what the spray foam did in terms of performance. He stated he would purchase the data analysis. Needless to say one could just look at the heating bill to see if there is difference. With variance in unit costs of fuel, admin, etc., I did not want to bother normalizing that info. The geek in me wants to explore data mining and inference. So off I go to explore Linear discriminant analysis and random forests.
For this exercise, I had three in-home temperature points, one outside, and several power related measurements. So far I had close to 3 million data points. I searched the web for an open source toolset that could help me with data analytics and decent plotting capabilities. Given I used the R programming language a few months back and liked the graphing capabilities in the ggplot2 package, it became my tool of choice. Note that Python is making in-roads in the data analysis space and for now, I want to remain focused on data analysis so R it is.
The idea of setting up a surveillance system has been on the to-do list for a long time. Given there have been a few break and enters in our neighbourhood for petty stuff and the last straw was a break-in in my vehicle, I decided to set one one up. Why make it easy and purchase a ready to go camera like a foscam? It is would not be as exciting. After some searching, I ended up with purchasing the following from Newark Element14:
2x -RASPBERRY-PI-RASPBERRY-PI/8GB-USD-MODEL B – 8GB SDCard W/ NOOBS PRE-INSTALLED
I got around to set up the 120 GB SSD on the quad. I ended up making my own power cable with header wires to connect to +5 and Ground pins. I could not find a power connector that fit it J12 on the board at the local stores and didn’t want to order a small part online and pay for shipping. What I have works.
The process was rather painless at first. I followed the procedure for creating a bootable image via OSX as described at the Udoo website. I then booted the board with the newly imaged SD card with the SSD connected to the board. I then installed gparted via
sudo apt-get install gparted
then ran
sudo gparted
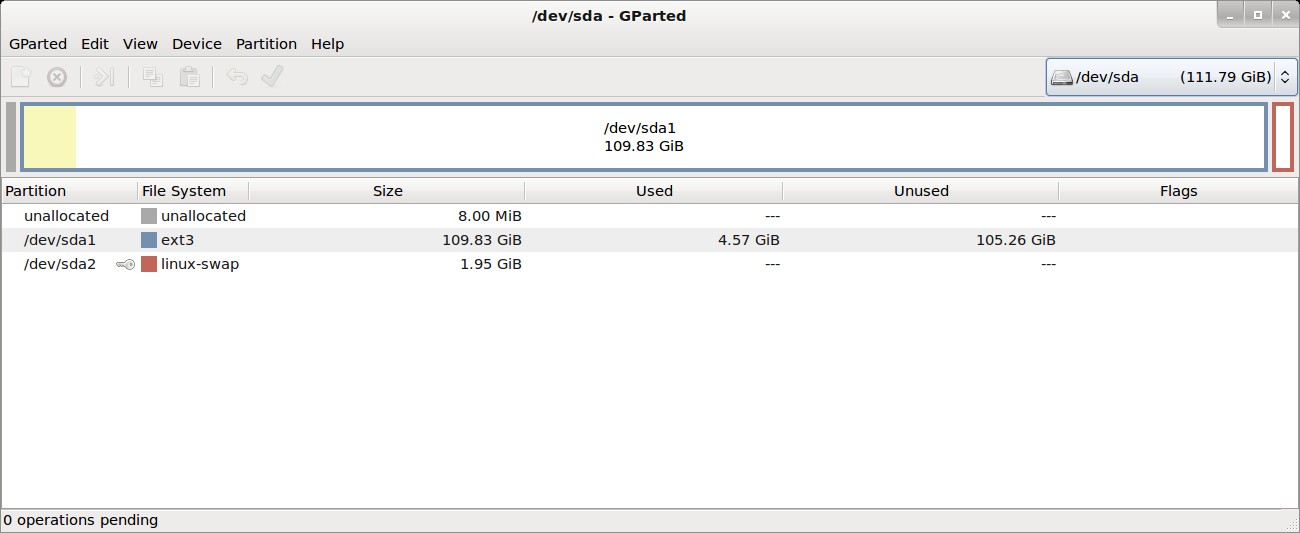
to partition the SSD and also create another partition on the SD card for backing up stuff since I had about 23 GB extra on the card to use.
I liked what another Udoo user suggested and allocated space for u-boot in the event that one day a complete boot from the SSD arrives. I created a partition for root/home and another for the swap as shown below.
Once the partition was complete, I did a quick check with fdisk -l to make sure the device was listed. I then mounted the SSD e.g. sudo mount /dev/sda1 /media/ssd for my environment. Then followed the instructions posted at elinux.org using the wget/tarball approach. The only thing left to prepare u-boot via setenv root… as the stated int the instructions. I noticed that my osx did not recognize the udoo quad plugged in the usb port and concluded I was missing a driver. I ended up installing the osx version from Silicon Labs. Once that was complete, I proceeded with SerialTools to interrupt the boot process.
I set the root parameter as suggested and resumed the boot process. Under that scenario, I could not get the root system to point to the SSD. It was just booting like there was just an SD card. What I had to do was change the mmcroot to point as follows
mmcroot=/dev/sda1 root wait
rather than /dev/mmcblk0p1
I could not otherwise make the system root/home point to the SSD. I’m not a hard core linux person. This approach was not described as part of the instructions and I ended looking at the boot arguments to make this work. The last touch was to set up /ect/fstab to deal with the swap partition and my backup space on the SD card.
Note that the UUID is specific to my environment and can be found via the blkid command. I rebooted the board (sudo shutdown -r now) and then ran
df -h
and
swapon -s
and the output shown below.
I then installed mysql server as per standard Ubuntu instructions. What is left to do is to port what I have on my PC to the quad and replicate the SCADA side. Once that works, I will move the arduino code and energy monitoring hardware to the quad as well. Then call this project a day.
I received my UDOO Quad today. I was not expecting to dust off my faithful home energy system I wrote a couple of years ago. It has been running well yet I feel guilty of having a home computer running 24×7 to act as my SCADA host. The UDOO is the board that will blend both the Arduino and Linux in a nice board and allow Solid State Drive to hold all the data. On its own without a SSD it consumes around 3.7 watts in-standby.
I currently have about three years worth of energy and temperature data that I also don’t want to lose and it has to be migrated as well. I’m hoping to analyze it using the R-Language one day. I’m hoping that it should be a relatively easy port as everything is cross platform.
Learning image processing using C++ is not practical for a newbie like myself as it is not conducive to trial and error. Besides, I would like create a model and explore it in an iterative fashion before I code it in C/C++/ObjectiveC.
I opted to install GNU Octave on the Mac Mini since all my dev is on that platform. I did install it on Windows 7 a while back for an earlier project so I know what it can do. I also wanted a tool that was almost 100% compatible with MatLab code.
Installing GNU Octave
My dev box consists of a Mac Mini with 2.3 GHz Intel Core i7, 16GB RAM running OS X version 10.8.3 (Mountain Lion). There seems to be a lot of issues with installing Octave in OS X based on what I see on the web. I went down the MacPorts path since I used it for some other installation. Continue reading →
I read yet another book on iOS development and got the creative juices flowing with lots of ideas for some image processing. That said, I’m starting to feel like a hoarder of electronic parts and opted to put a coupleSeedStudio Water Flow Sensors to some use. Besides someone asked me to describe how to use them in simple terms. So this side trip’s goal is put something together to measure the flow from kitchen faucets. The functional requirements include the following:
Hot water line measurement
Cold water line measurement
Current flow rate in L/sec
Running volume for the day in L
Max flow Duration for the day in seconds
Min flow Duration for the day in seconds
Average Duration for the day in seconds
Total flow duration for the day in seconds
Integration with my existing M2M Mango instation over Modbus