The idea of setting up a surveillance system has been on the to-do list for a long time. Given there have been a few break and enters in our neighbourhood for petty stuff and the last straw was a break-in in my vehicle, I decided to set one one up. Why make it easy and purchase a ready to go camera like a foscam? It is would not be as exciting. After some searching, I ended up with purchasing the following from Newark Element14:
- 2x -RASPBERRY-PI-RASPBERRY-PI/8GB-USD-MODEL B – 8GB SDCard W/ NOOBS PRE-INSTALLED
- 2x – ADAFRUIT INDUSTRIES-1012-USB WIFI MODULE, 802.11b/g/n, RASPBERRY PI & BEAGLEBONE
- 2x – RASPBERRY-PI-RPI CAMERA BOARD-ADD-ON BRD, CAMERA MODULE, 2RASPBERRY PI
- 1x – RASPBERRY-PI-RPI NOIR CAMERA BOARD-CAMERA BOARD, BCM2835 RASPBERRY PI
I placed the order on a Thursday, received the goods the next day, and was up an running on Sunday and debuging for the next few days. 🙂 This was a trivial project given the amount of information on the web from people who already did the same thing.
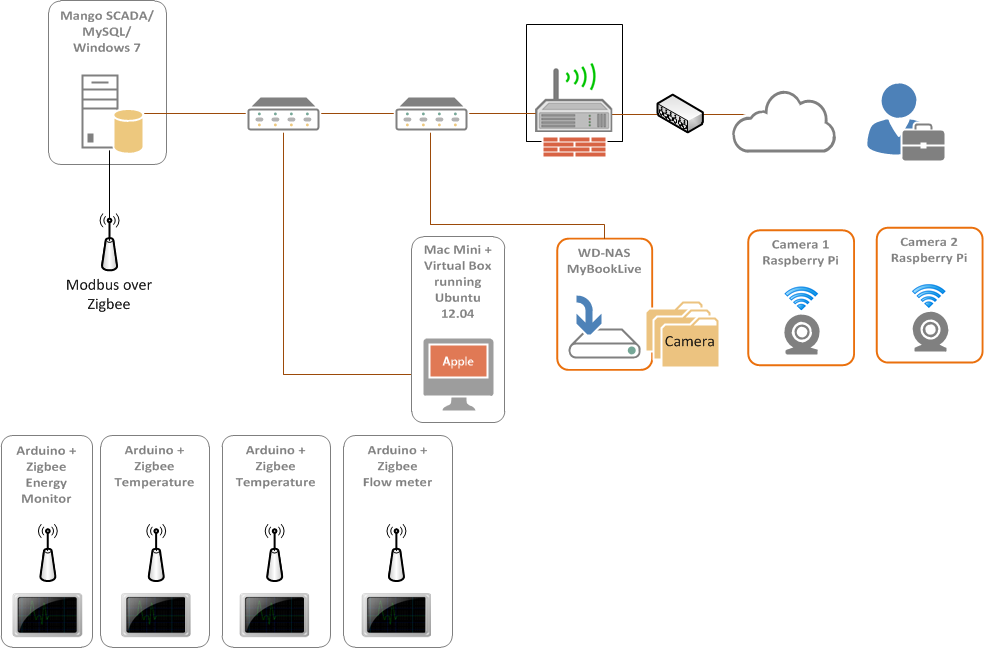
Partial View of my Home Network
The home network has a several devices connected. For the purpose of this discussion, I utilized my WD-MyBookLive which was basically doing nothing. Also storing media on an SD card in the Raspberry did not appeal to me. Besides, with SSH enabled on the WD, I can do all the Linux stuff. More about that later. The following is a partial network diagram of what is going on at home.
The steps taken are the following:
- Setup Raspberry with Raspian OS
- Configure WIFI
- Install and Configure Motion
- Setup WD MyBookLive and share folder
- Update fstab in Raspberry to automatically mount the share
- Lots of files will be created. Some purging of files via CRON is in order
Setup Raspberry with Raspian OS
This horse has been beaten enough and will explained on the web. I ordered the SD card with NOOB and when powered up, one is presented with the option to install Raspian. This was absolutely painless. Update raspian and the packages too at this point.
sudo apt-get install rpi-update
sudo rpi-update
sudo apt-get update
sudo apt-get upgrade
Configure WIFI
This was the part that created most grief. That light on the USB Wifi dongle did not want to light up. The following entries in the /etc/network/interfaces file worked and opted not using the wpa_supplicant configuration file.
e.g. wpa-roam /etc/wpa_supplicant/wpa_supplicant.conf
auto lo
iface lo inet loopback
iface eth0 inet dhcp

auto wlan0
allow-hotplug wlan0
iface wlan0 inet dhcp
wpa_ssid "ssid"   ## <- add your own SSID
wpa_psk 3eb4ff0bd5c7d4d366d1e5287231b333c3f76e442ea9b6bd1c640fee9yadiyadiyada
For the wpa_psk invoke the command wpa_passphrase ssid to generate a passphrase for an added layer of security and then copy the generated key in the interfaces file.
Install Motion and Configure Motion
This is well explained here and works. My configuration is a little different than posted in the link and is as follows:
daemon = on
logfile = /tmp/motion.log      # as per the link
width = 640                    ## "low" res is good enough
height = 480
framerate = 10                 ## this might be high for my setup
despeckle_filter = EedDl       ## I don't want snowfall to trigger motion
area_detect = (not defined)
mask_file = /tmp/cammask.pgm   ## vehicle traffic causing too much motion
minimum_motion_frames = 3      ## need 3 frames of motion detect before reacting
pre_capture = 2                ## number of frames to capture before detection
post_capture = 3               ## obvious
ffmpeg_video_codec = msmpeg4   ## to make microsoft player happy
locate_motion_mode = on        ## draw a box on what triggered the motion
locate_motion_style = box
target_dir = /mnt/nas/camera   ## where to save video and pix
picture_filename = %Y%m%d%H%M%S-%v-%q  ## append sequence instead of prefix
movie_filename = %Y%m%d%H%M%S-%v       ## append sequence instead of prefix
stream_motion = off            ## might change this to on later
stream_maxrate = 1             ## and capture motion at maxframe rate
stream_localhost = off         ## allow streams from beyond localhost
stream_port = 8081             ## change if you want
stream_limit = 0
stream_auth_method = 1         ## basic authentication
stream_authentication = username:password  ## private info
webcontrol_port = 8080         ## change to something else if you want
webcontrol_localhost = off     ## allow control from beyond local host
webcontrol_html_output = on
webcontrol_authentication = username:password
The camera captures people walking and now points more in the yard than the road. Although not a freeway, the car movement is generating too much motion and generating lots of files. To create a mask file is simple. I followed these instructions and it worked fine. The exact steps on this end included the following:
- Copy jpg from camera image that has moving car
- Open file using Gimp or one can use paint/photshop. Gimp can save as PGM format as raw format
- Black out areas that you don’t want movement
- White out areas that are in scope
- Save file as PGM as Raw
- Copy file to a directory that motion can read. I used WinSCP to transfer the file to the Raspberry
- Change the ownership of the file so that motion can access it
Not that sudo motion start/stop/restart and the motion.log file are your friends when trying to tune motion.
Setup WD MyBookLive and share folder
Browsing the files from OSX proved painfully slow. What can be done though is use TwonkyMedia Server installed in the the WD. Mine is an old version 5.1.9 and felt that upgrading was not worth it at this point.
Enabling SSH
Enabling SSH so that one can remote into the WD is simple. Log into your WD device as per usual e.g. http://<ipadddress> Once logged in, change the URL to
http://<ipaddress>/UI/ssh
and a screen similar presents itself.

Enable SSH and then via the console–OSX is built-in or if you are using windows something like putty–log into the WD. At the prompt type in ssh root@<ipaddress> and use default password of welc0me. Be sure to change the password when you log in to close that security hole.
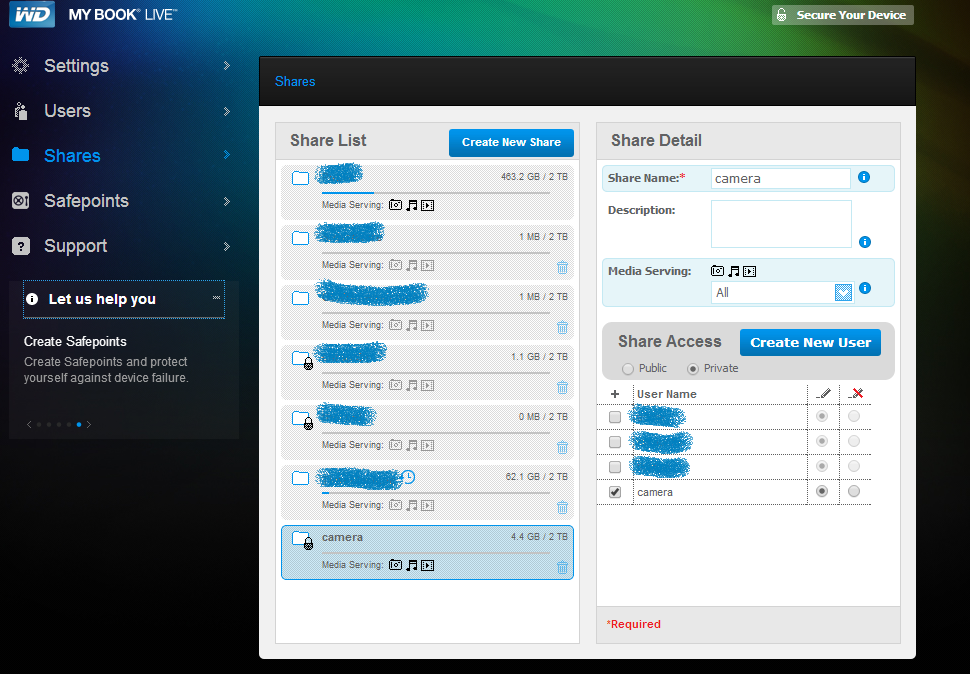
Go ahead a create a user and share that the Raspberry to push files too.
Update FSTAB
Now that a share is created in mybooklive, it is time to have it automatically mount on the Raspberry by adding a line to the /etc/fstab file. For example, let’s assume the IP address of your MyBookLike is 192.168.1.123, your share is called camera in the WD, and mounting to a directory /mnt/nas/camery in the Raspberry, the the following would end up in your fstab file.
//192.168.1.123/camera /mnt/nas/camera cifs username=yourUserNameInWD,password=yourPasswordInWD,rw,nounix,iocharset=utf8,file_mode=0777,dir_mode=0777 0 0
Note, don’t leave a space between the commas. Type in mount -a to see if all is good and the contents of share on MyBookLive should show up. Reboot for good measure e.g. sudo reboot
CRON Job
A script in the MyBookLive runs weekly and tars files older than 7 days are archived then removed. anacron is what configured in the WD alread so in the etc/cron.weekly folder, a file archivecam with the following content does the work. The execution flag needs to be set via chmod +x achivecam.
#!/bin/bash
TODAY=$(date +"%Y-%m-%d")
FILENAME="camarch.$TODAY.tar.tgz"
ARCHIVEDIR=/shares/camera/archive
CAMERADIR=/shares/camera
## echo "Archiving Camera data to $FILENAME"

## remove files older than 7 days and remove JPG/AVI
find $CAMERADIR/  -maxdepth 1 -mtime +7 | xargs tar -czf $ARCHIVEDIR/$FILENAME --remove-files
The crontab file was already configured to run what is in the cron.weekly directory
10 3 * * 7 root test -x /usr/sbin/anacron || ( cd / && run-parts --report /etc/cron.weekly )
Backlog
The AVI files generated present a convenient way review the motion throughout the day and I’m quite impressed with the motion functionality out of the box. That said, one of the goals is to perform image processing on the files. OpenCV is still sitting waiting for something to do. I still need some hardware with more punch to do this in a mobile setting so for now it is an off-line process. Gait Analysis is an interesting area to explore and this little setup is not equipped for that.
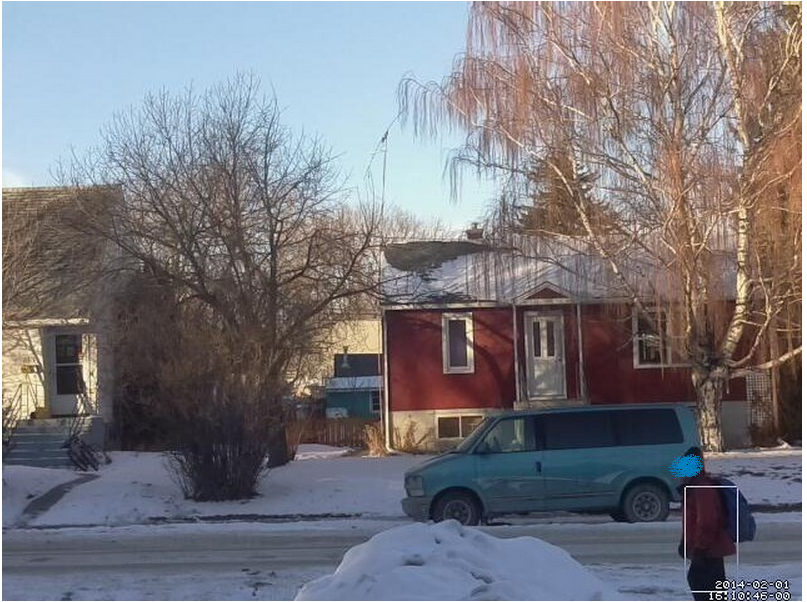
The camera purchased is compact and quite clear. The PINoIR shall be used for a inside-birdhouse view for spring-time on another Raspberry. The following is an motion captured before moving the camera to its new location.
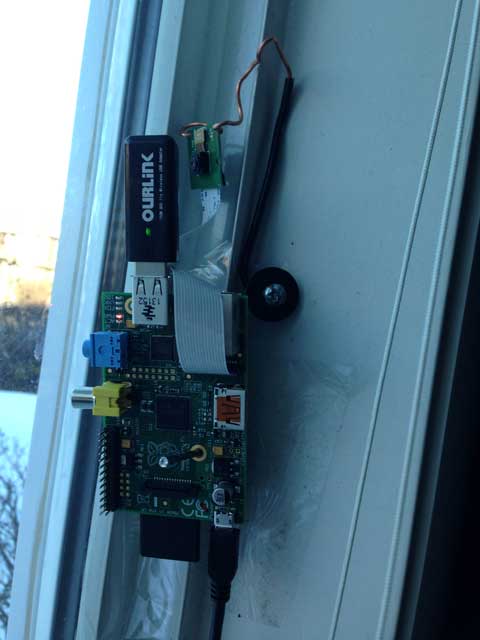
FrankenCam
The camera is temporally mounted until spring time on the vertical end of a window. I threaded some 14/2 copper wire through the two holes in the camera PC board which allowed me to point the camera and remain in that position. Not a pretty job yet functional.